Farm Girl

Monday, January 31, 2011

Lemon Brioche Muffins

It is winter here on the Central Coast of California, yet with this hot streak we've been having it feels more like summer. Something I associate with both Summer and Winter is the fresh taste of lemons. Specifically, I love Meyer Lemons because of their sweet, compelling scent and their flesh which doesn't shatter when squeezed to make lemonade or citrons pressés. 

Donna Hay's most recent magazine contained a recipe for Orange Brioche Muffins with a Lemon glaze on top….Hmmm, time for me to mix it up a little. Instead of adding orange zest, I'm adding lemon. Rose geranium seems like it would bring it up a little notch as well, so, here goes….

Lemon (and Rose Geranium) Brioche Muffins with Lemon Glaze
(say that 10 times faster)
time: approximately 4 hours
Yields 6 muffins
Materials needed:
Scale which measures in grams (Target carries some for about $30)
Oven (preferably gas)
KitchenAid mixer with dough hook
Microplane (or you can use that side of the cheese grater which is really tiny holes)
A coffee grinder or small food processor
A spatula
Measuring cups and spoons
A sieve
Some muffin or cupcake tins
1 clean cloth

Ingredients:
For the Bread:
8 grams of instant dry yeast (about 2 tsp)
1 tablespoon lukewarm water
55 grams granulated sugar (about 1/4 cup)
1 meyer lemon, zest of
4 leaves of rose geranium, optional (I used a mixture of Attar of Rose, Lemon Rose and one of which we've forgotten the name.)
1/4 tsp sea salt flakes
2 tablespoons lukewarm milk
250 grams of flour, plus more as needed (1 2/3 cup flour) (I used Huasna Valley Farms because it's local)
2 eggs, lightly beaten (room temperature) The eggs are from my own chickens
225 grams of unsalted butter, chopped and softened (about 2 sticks)

For the Wash:
1 egg slightly beaten

For the Lemon Glaze:
320 grams powdered sugar, sifted (2 cups)
1 Tablespoon boiling water
2 Tablespoons lemon juice

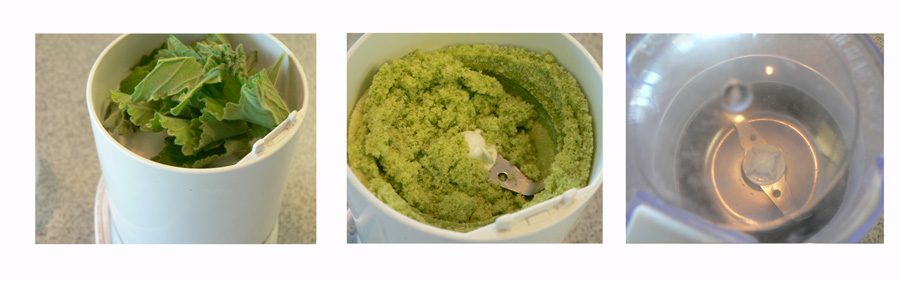
1) Mix the yeast and water in a bowl and mix to combine, set aside for 5 minutes, or until bubbly. Pulverize the granulated sugar and the rose geranium leaves in the coffee grinder until smooth.  Combine the sugar mixture with the salt and milk in a small bowl. Zest the lemon into the flour. Place the flour, eggs and the activated yeast in the bowl of the mixer and beat on low for 1 minute with the dough hook. Increase speed to high, add the sugar mixture and beat for 10 minutes or until the dough comes away from the sides of the bowl.


The most important part of baking for me is Mise En Place (meaning getting everything ready to bake). The second most important thing for me, is in keeping the kitchen decluttered so as not to run out of room.


2) While still mixing, add the butter and beat for 6-7 minutes or until
 glossy and elastic.


3) Place the dough in a bowl and cover with plastic wrap. Let rise in a warm place for 2-3 hours or until the dough has doubled in size.

4) Turn out dough onto a lightly floured surface and divide into 6 equal size balls and knead until smooth. Grease the muffin tins, and place one ball in each cup. Cover with a  clean, damp cloth and set aside for 1 hour

5) Preheat oven to 400˚F. Brush dough with egg wash and bake for 15-17 minutes or until golden. Cool on a wire rack

6) Make the lemon icing by mixing sugar, water and lemon juice together. Spoon icing over the muffins and top with a candied lemon peel and let set.

THE FINAL PRODUCT
 
Note: When proofing the dough, do not place in an extremely warm place as it will melt the butter and make it a greasy mess. 65˚F is about how warm you want it. Also note: The flour I used is whole wheat. If I were to make this again, I would use regular all purpose. I would also probably want to add an extra egg yolk and some more zest (I love zest). I'll have to make this again to see if I can improve it. Toodles :)

Monday, September 13, 2010

Rum Roy Rogers Cake

Recently my friend Rafe had a birthday. It is my tradition, started almost a year ago, to bake my friends a cake for their birthday. Trouble is...I like to make the cake match their personality, which may or may not correspond to their original preferences. For Rafe, at first I was thinking a variation of a Rum Cake, but I found that uninspiring. Then I remembered that I'd been meaning to try a Coca-Cola cake. This thought led me to the memory of my brother always ordering a Roy Rogers while I had the Shirley Temple at restaurants. That sounded too childish though, to make a "Roy Rogers Cake." Thus the plan for the Rum Roy Rogers Cake was born.

Essentially, I took the recipe for the Cola Cake and the Rum Cake and I merged them together to form my first attempt. I may or may not make alterations in the future.

Ingredients for the cake:

3 cups ap flour sifted
1 tbsp cornstarch
1 cups sugar
2 sticks butter
3 tbsp cocoa powder
1 1/4 cup Coca Cola
1/4 cup grenadine
1 tbspn buttermilk powder
1 tsp baking soda
1/2 tsp baking powder
6 eggs
2 tbsp vanilla
1 mini bottle Myer's dark rum
2 c. miniature marshmallows

Preheat oven to 350˚F
Grease and flour two round cake pans

Sift the dry ingredients into a bowl and set aside.

In a small saucepan bring the butter, Cola and grenadine to a boil, set aside to cool for a few minutes.

Meanwhile break the eggs into a large bowl, and beat slightly. Add the vanilla and the rum and stir. Add the butter/cola/grenadine mixture. Mix well.

Whisk in the dry ingredients, slowly adding more. Mixture should be around the consistency of (boxed) brownie batter. Stir in the marshmallows.

Pour batter into prepared pans (marshmallows will float to top and caramelize while baking) and bake for 15-20 minutes or until a toothpick comes out clean.

Remove from oven and let cool in pans.

Cola Buttercream (the hard way, lol)
1/3 cup coca cola
2 sticks unsalted butter, softened
2 tbsp grenadine
2 tbsp dark rum
2 tbsp vanilla extract
3 tbsp cocoa powder
1 tbsp pomegranate liqueur (available in mini-bottles at Bev-Mo) (optional)
About 2 lbs powdered sugar
1 cup almond meal (optional)
pinch of salt

In a mixer fitted with the whisk attachment beat the butter until smooth.

Sift in the cocoa powder and a little bit of powdered sugar.

Slowly add the liquid ingredients, alternating with powdered sugar (sifted in) and the almond meal. Add salt to taste.

Only add as much powdered sugar as will make the buttercream stiff enough for your usage. If using it more like a glaze, then only add as much powdered sugar as will make the buttercream not look curdled. 


I garnished the cake with maraschino cherries sans stems for a simple presentation, but I didn't have the opportunity to photograph.

Thursday, August 5, 2010

New Blog Design

Hi everyone! Which means all of two people that actually read this blog. Well, you might have noticed that my blog is undergoing some aesthetic challenges. I'm trying to teach myself how to make the HTML background coding more "me." Thus the reason for the temporarily ugly background.

I plan on fiddling around some more on it tomorrow as well as posting another recipe. I was thinking Chocolate Pepper Macarons. If they come out "all right" I will call them "Pep-Choc." Oh la la! I have to go separate the egg whites now if they are to be sufficiently aged! A bien tot.

Sunday, April 25, 2010

Raspberry Jam


      Raspberry jam is a wonderful simple pleasure that brings color into your life when summer is over. Surprisingly it takes more than just raspberries and sugar to make this jam. It also takes inspiration. Inspiration can be taken from the scent of lilac edged sweet peas, the buds on an Othello rose, watching vanilla beans steep in vodka, or even Suki wanting her picture to be taken.

     Shown above are not only the regular red raspberries, but also golden raspberries, which I must admit are my favorite. Somehow they manage to taste like honey and still maintain the characteristic raspberry flavor. You might find these in the supermarket, but I find that grocery stores tend to carry fruits that have less developed flavor than those you might find elsewhere. There is good reason for the less pronounced flavor. It is that these varieties tend to have an extended shelf life and so they wont spoil as quickly. If you have the chance, though, go to a Farmer's Market or a family run farm near you to get the best produce possible. The berries used in making the jam are from Rutiz Family Farms in Arroyo Grande, CA.

Step 1 in Jam Making: Clean the kitchen. This includes all of the dishes waiting to be put away in the dishwasher.

Step 2: Go and get your berries. The fresher you get them, the more flavor is imparted into the jam! (Note that the final volume of jam is roughly equivalent to the amount of berries used)

Step 3: Wash/rinse your berries. Hey you've worked hard so far, and you wouldn't want to ruin your jam         by getting bug guts in it.

Step 4: Wash jars and place the clean jars and lids in boiling water for 10 minutes. Keep them hot. I usually keep them in simmering water while I'm jamming. (note: keep jars in one pan of boiling water, and the lids in a different one to facilitate their retrieval later)

Step 5: While your berries are drying on a paper towel, measure out as much sugar as you have berries. (for example if you have 4 cups of berries, measure out 4 cups of sugar)

Step 6: Place berries in a large saucepan and cook over high heat. (This will make them juicy) Stir Constantly, and mash the berries. Bring to a full boil, let it boil hard for 1 minute, stirring constantly.

Step 7: Add sugar, return to a boil, and boil until it forms a gel (about 5 minutes) You can test for the gel stage by having a glass of ice water at hand, and occasionally dropping a little of the mixture in. Gather the mixture into a little ball in the water, take it out of the water and if it immediately loses shape and flattens, then the mixture is ready. This is what is known as the "soft-ball stage." If you're using a candy thermometer, the soft-ball stage is reached between 234˚F-240˚F

Step 8: Pour mixture into sterilized jars (careful those jars are HOT!) leaving 1/4 inch of room at the top. Wipe the rim and threads with a damp towel and seal lids. Tighten lids, but don't super-human strength tighten them.

Step 9: Turn jars upside down to cool. As the air inside condenses when the jam loses heat, the pop up lid will be sucked down, and you'll hear a "pop." The jars that "pop" are properly sealed and can be stored in the pantry for about a year. Any that do not "pop" should be put into the fridge so as to be consumed first.

Step 10 (optional): Make up cute little labels for your jam that can say stuff like "Royal Raspberry Requirement to be used by x/x. Any undeserving man who touches this jar will have to do the dishes." :) You can have lots of fun here.

      Jam makes great gifts and it gives the maker  a wonderful feeling of accomplishment. "Look at me, I made something from scratch. Not everyone can do that." Now sit back, relax with a viewing of "How to Marry a Millionaire" and eat some toast with butter and raspberry jam.

Bon appetit!♡

Tuesday, July 7, 2009

Avila Beach Lighthouse Tour


Avila Beach is a California paradise. Generally the waters are as aqua blue, if not bluer, than my picture details. If you ever have the chance to go to Avila, take it. If you ever have the chance to take the free hiking tour to the historical lighthouse, it is your funeral. 

Okay, maybe I'm exaggerating just a wee bit. But it is a long hike, with steep uphill and downhill sections on a crumbling path that does border a cliff or two during the journey. Not to mention that they have you sign a waiver for each person to go on the tour, that relieves PG&E (for they own the property) of any liability in case of injury or death. Hmmmm. You'd think that this would have warned me of the unpleasantness of the journey. 

The upside of the trip was that there was a lot of historical trivia learned on the tour. For example: Smith Island held five families on it when Avila was considered a whaling village. In case it isn't obvious, in its above picture, Smith Island looks like it would contain maybe 2 to 2.5 of a generously sized house today. 

The lighthouse itself  was  marvelous, despite it being a brief tour. It was made in the Victorian style and volunteers are undergoing its renovation. So far they have been doing a beautiful job. 

One of the things mentioned right before we entered was that there were tales that the basement might be haunted by a child. This piqued my curiosity as I am an adamant fan of Ghost Hunters, (not that I believe it nor disbelieve it, I just think it is interesting and hilarious). Unfortunately upon my seeing all 10 square feet of the basement, I did not experience anything from the paranormal realm.

I left the lighthouse and went outside to have lunch, hopefully spot a whale migrating, and to wait for the return hike back to the parking lot.

Another positive point: the generous hike allowed for a generous serving of ice cream  when I returned home. It restored my good spirits right away, as who can help but smile when Chocolate Malted Krunch comes a knockin' on a cake cone?